Welcome blog hoppers! I hope you're enjoying the blog hop as much as I am. There have been so many tutorials that have had me thinking, Why didn't I come up with that?! and I didn't know the ruler could do that!
For my tutorial, I'm going to show you how to put together a staggered, strip-pieced dresden like my Color Cog mini quilt.
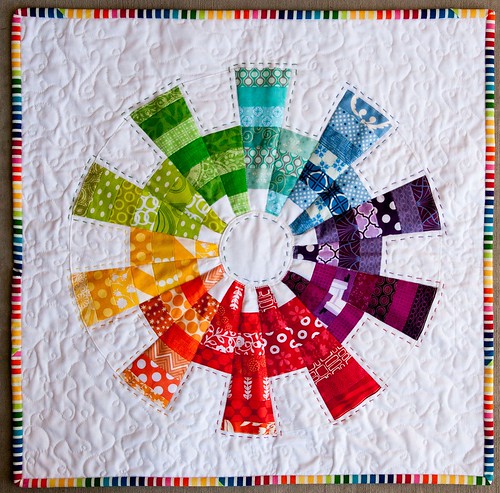
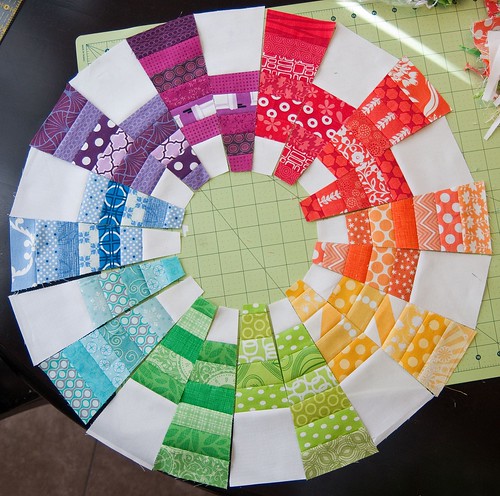
Since the EZ Dresden ruler requires 20 blades to make a full circle, and since there are 12 colors in the traditional color wheel, you'll need to omit two colors (four blades) to achieve a full circle. (I left out blue-purple and I combined yellow with yellow-orange.)
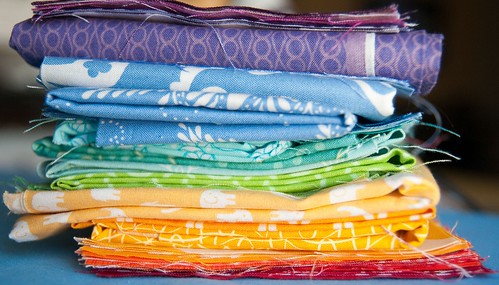
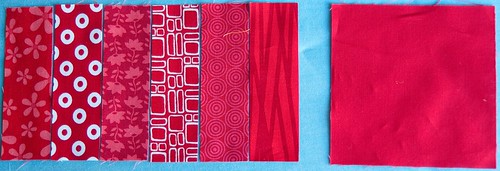
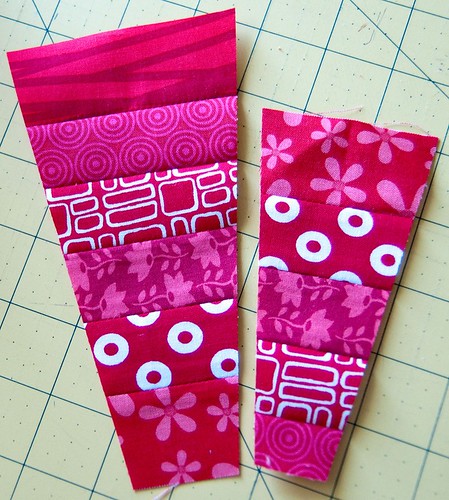
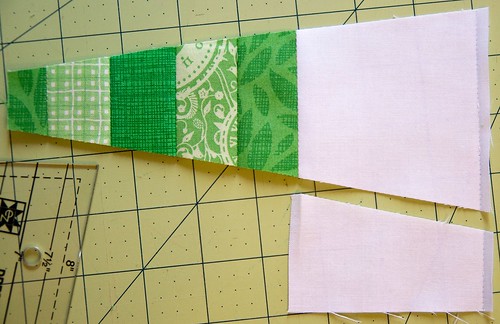
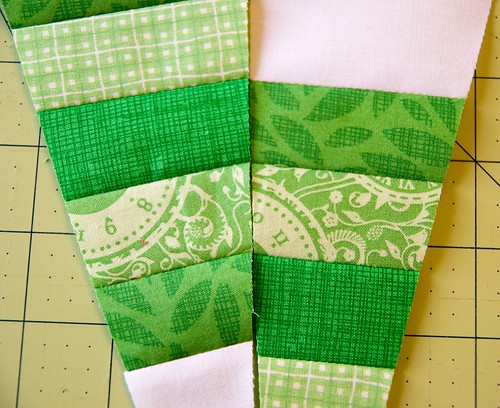
Start by cutting at least six strips that measure 1.5" x 5" for each color. This will yield two blades. You can have anywhere from two to six different fabrics. (I varied between four and six.) You'll also need a background piece that measures 3.5" x 5" for each color, so a total of 10 rectangles. I used Kona white. The image below shows only four colored strips, so just pretend there are six strips shown.
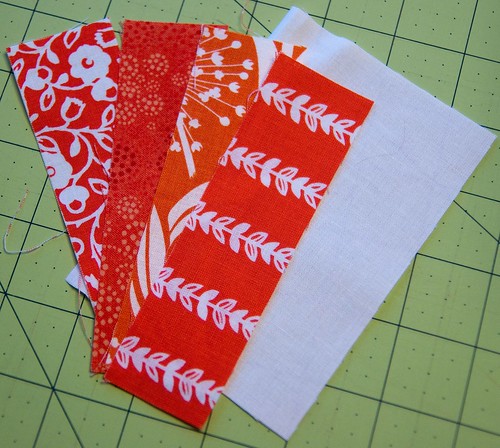
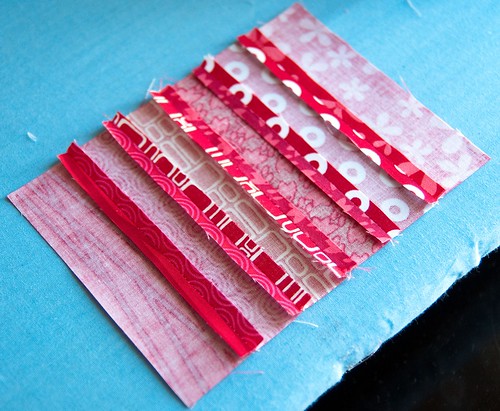
Layout your strips in an order that is pleasing to you.
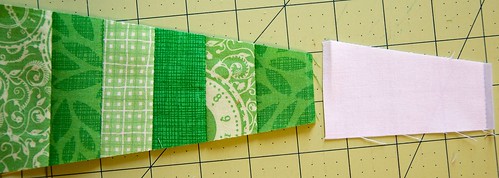
Piece the strips together and press the seams open or to the side. I found that pressing them open helped since there are so many pieces in this mini quilt.
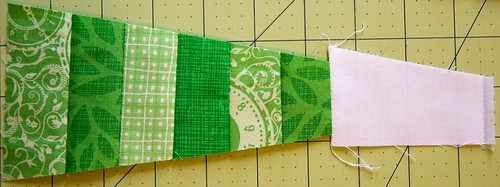
Next, take your EZ Dresden ruler and line up the top of the ruler with one end of your pieced strips near the left edge if you're right-handed or near the right edge if you're left-handed.
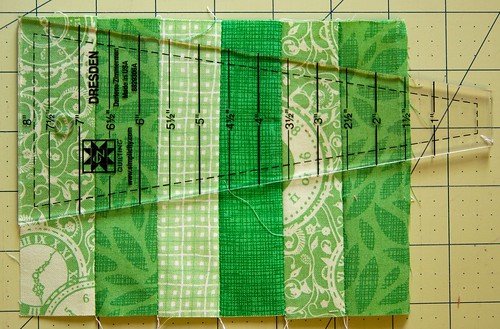
With your rotary cutter, make a cut on the side with the greater amount of fabric outside the ruler. Then cut on the other side.
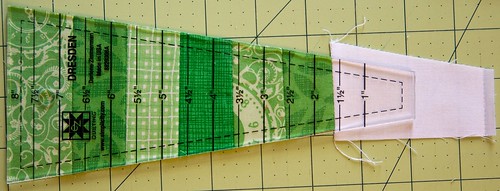
Turn your ruler around and line up the opposite end of your pieced strips with the 5" mark on your ruler. Cut the remaining side and the bottom (narrow) edge.

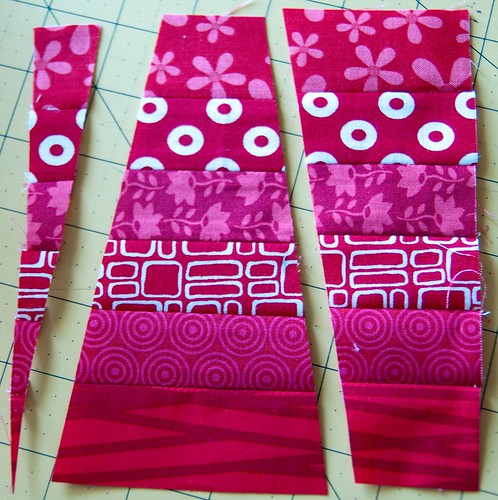
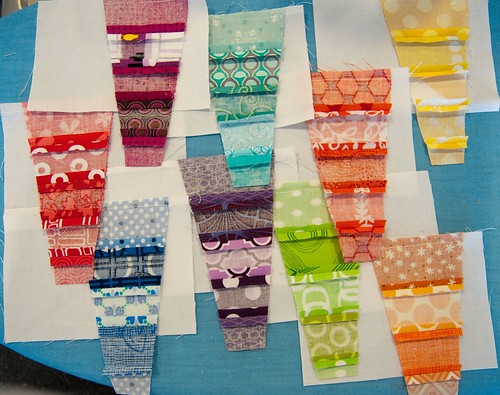
You should now have two sizes of blades. Repeat the previous steps for all your colors. You should now have 20 blades, 10 of each size.
Now, take your smaller blade and your 3.5" x 5" background piece and lay them right sides together as shown below, off-setting about a half inch of the background fabric.
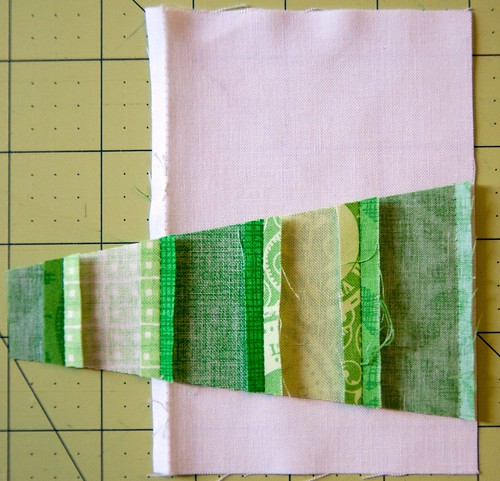
Stitch along the longer edge and press your seams open. Repeat with your nine remaining smaller blades.
Lay your ruler on your smaller blade, aligning the narrow end of the ruler with the smaller end of your pieced strip. The pieced strip and the ruler should match up pretty well end-to-end.
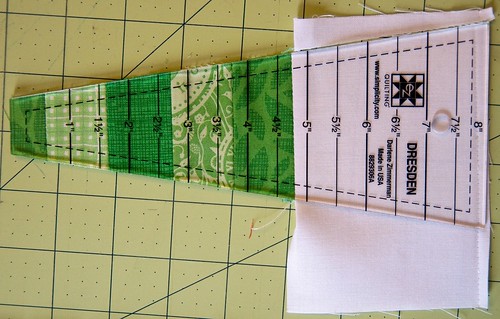
Cut on either sides of the background piece to get your 8" blade.
Take the leftover background piece from the previous step and place the wider edge along the narrow edge of your longer blade, right sides together.
Stitch in place and then press your seam open.
Place your ruler on top of your fabric, making sure to align them correctly. Trim the excess. Repeat with your nine remaining longer blades.
Now place the longer blade and the shorter blade side by side, matching the second to bottom colored fabric on the long blade with the second to top fabric on the short blade.
Lay all your blades side by side to create your dresden circle.
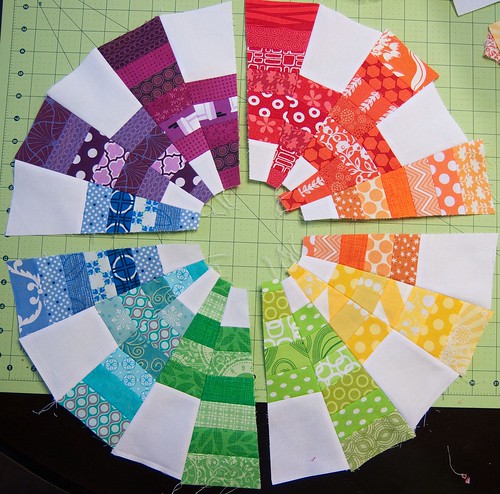
At this point, you have a couple options for piecing your dresden. If you want to use set-in seams (requiring you to piece the curve), separate your dresden circle into quadrants and piece each quadrant.
If you don't want to piece the curve, but you want a finished outer edge before appliqueing your dresden to another piece of fabric, you can either make traditional dresden plate points, or you can use Lee's fantastic idea and press the outer edge under before piecing the blades. (I wish I had thought of this!) I pieced my entire dresden, then turned and pressed the outer edge under, and appliqued it to my background fabric (Kona white). I also added another appliqued circle to cover the raw-edged circle of the dresden.
Once you've attached your dresden to your larger background fabric, you can baste it and quilt it however you like. I hand quilted around the perimeter of the cog design as well as in the center circle. Then I used white thread to free-motion quilt by machine in the background.
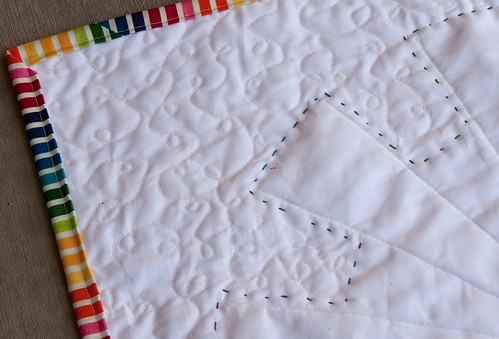
I also quilted in the ditch of each blade for a little more security.
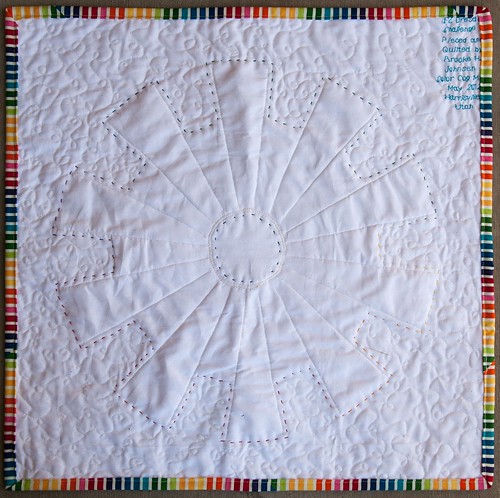
Once everything is quilted the way you'd like it to be, attach your binding. I used a rainbow stripe from the Remix line from Robert Kaufman to reinforce the color wheel theme.
And there you have it. A finished color cog mini quilt.
I hope you've enjoyed this tutorial and that it's given you some more ideas of ways to use the EZ Dresden ruler. If you'd like a chance to win one of your own, leave a comment. I'll draw a winner on Wednesday, June 13.
Also, make sure to visit the other bloggers. You can see a list of the schedule here.
I absolutely love this!!! Thanks so much for your step by step tutorial, it makes me think I can actually make this :)
ReplyDeleteOh, I LOVE combination of methods! I have a couple of brightly colored fat quarter bundles sitting here wanting to be made into something sweet, and I think this is it! You have such imagination. Thanks so much for sharing.
ReplyDeleteYour Colour Cog is great. Thanks for showing the method to us.
ReplyDeleteLove this! I love color wheel quilts anyway!
ReplyDeleteWhat a great quilt! Thanks for the inspiration and for the chance to win.
ReplyDeleteGreat tutorial and design. Keeping my fingers crossed for the ruler.
ReplyDeleteI love this project too. I am going to have a long list of projects after this is over.
ReplyDeleteI love this Brooke and I'll be making it as soon as I track down a ruler!!
ReplyDeleteYour color wheel turned out great! More inspiration to stretch my imagination!
ReplyDeleteWonderful tutorial.
ReplyDeleteGreat tutorial, thanks for the chance to win the ruler :)
ReplyDeleteBrooke--you did such a great job with this. It's a really fun project!
ReplyDeleteyour little quilt is so different from many of the others!
ReplyDeleteI think it would make a great gender neutral baby quilt!
I have always wanted to do a color wheel quilt. This is just gorgeous!
ReplyDeleteGreat color wheel Dredie! Wonderful design with great movement.
ReplyDeletelove love love this!!!
ReplyDeleteLove your project and I'd love to try out this new ruler!
ReplyDeleteYour Color Cog Mini Quilt is wonderful! Love what you did. Thanks for sharing the tutorial.
ReplyDeleteI really love what you've created with this ruler. It's awesome. Thank you for showing us.
ReplyDeleteSo pretty!!!
ReplyDeletevery very fun! thanks for sharing your quilt!
ReplyDeleteThis is awesome! You make it look so easy to make the blades.
ReplyDeleteWhat an adorable project! I have this dream wherein I have time/energy to make all kinds of cute decorative mini quilts... Alas, I have neither, LOL. Someday! ;) Thanks for sharing and for teh chance to win!
ReplyDeleteLOVE your color wheel quilt. And thanks for a great giveaway!
ReplyDeleteOh this is wonderful! Love it and thanks for the great tutorial!
ReplyDeleteWhat a great scrap-buster quilt. It gives me an idea for my spin on the dresden plate. Thanks for sharing.
ReplyDeleteI have never heard of a Dresden ruler. Interesting. Love the quilt!
ReplyDeleteWhat a fantastic tutorial! I love the Color Cog quilt, and would love to make one.
ReplyDeleteWow... Great inspiration! And the special hand quilting around the plate with variegated thread made a nice touch.
ReplyDeleteThanks for sharing
This is my fave so far! This was my first visit to your blog...I will be back. Luv your look
ReplyDeleteWhat a cool design! Thanks for the giveaway!
ReplyDeletePure genious Brooke! I love that you used the color wheel. Looks fabulous. -Julie
ReplyDeleteI love the color wheel effect and the staggered look of the blades. Nice design!
ReplyDeleteThis is such a clear and easy to follow tutorial. Thanks! I love you quilt and the play between the colors and modulated shapes. :)
ReplyDeleteHow gorgeous! I'm looking forward to trying my own Dresden soon!
ReplyDeleteThis is so beautiful! I want to make this right now!
ReplyDeleteThanks for the great tutorial. I love the all of the bright colors together.
ReplyDeletebeautiful makes me want to make one
ReplyDeleteGreat job. Unique idea.
ReplyDeleteOh, I love your idea! So pretty, and your hand quilting is perfect!
ReplyDeletethanks for the giveaway!
Beautiful! It's like sunshine and a rainbow all at the same time. Thanks for the give away chance.
ReplyDeleteSo beautiful!! You've come up with a really cute use of the dresden ruler. I'd really love to have this tool. The colors are wonderful!
ReplyDeletethanks for sharing!
What a great way to use the ruler. I love this design.
ReplyDeleteThis is a great tutorial - I'm not that good on round quilts with lots of seams but I think I can make it using your tutorial and THE RULER! Thanks for a chance to win.
ReplyDeleteAll I can say is, "Wow!" I love what you've done. Thanks for the great tutorial.
ReplyDeleteNever thought that this is possible with the ruler, nice quilt and very nice colors too!
ReplyDeleteGreetings from the Netherlands,
Marina Fluit
M.fluit@planet.nl
All I can say is "Wow"!! I love how you made this mini quilt and thanks for the tutorial - all those colours are amazing!!
ReplyDeleteLOVE YOUR QUILT!!! Thanks for sharing
ReplyDeleteLove this! It reminds me a little of the Purl Bee rainbow quilt but your tutorial makes it seem so much more do-able.
ReplyDeleteLove all the vivid colors in your color cog mini! Very inspiring too :) Thank you for sharing the step by step instructions.
ReplyDeleteLove pop of color that this is! Thank you for sharing.
ReplyDeleteReally like your quilt!
ReplyDeletethis is a wonderful quilt....you did a great explanation on the step by step tut...great color wheel quilt...thanks for the giveaway...
ReplyDeleteLove your quilt. I have a dresden quilt on my to do list, but haven;t quite made it there yet. These are very inspiring..
ReplyDeleteWow, you did a great job with this. I really love your design!
ReplyDeleteI love the color cog! Very cool. I really want this ruler now haha!
ReplyDeleteMulti pieced Dresden plate blades --- this is exactly what I was thinking of when I started looking at all the ideas on this tour. I love your staggered look to them.
ReplyDeleteYour quilt is amazing! Thanks for the great tutorial & for the chance to win an EZ Dresden Ruler.
ReplyDeletegreat idea and very clear tutorial. Thank you for your inspiration
ReplyDeletelove this idea and the tutorial was very clear and easy to follow. Thanks
ReplyDeleteI love this idea!Thanks!
ReplyDeleteI love your original quilt take on the color wheel. I've seen color wheel quilts before, but this one is very original! I'd love to win your giveaway. Thanks!
ReplyDeletevery good tute! love the idea and your color choices. thanx for the inspiration and the chance to win your dreden ruler.
ReplyDeletegreat tutorial, thanks for sharing it!
ReplyDeleteLove the color cog! And thanks for the opportunity to win.
ReplyDeleteOh, your little quilt is so cute - and so marvelously different from the traditional dresden. Way fun! I'd love a chance to try that dandy ruler for myself. Thanks for the giveaway.
ReplyDeleteThis is awesome, Brooke! I love it!
ReplyDeletefabulous...thanks for the detailed tutorial!
ReplyDeleteThis color wheel mini quilt would look good on my wall. I am amazed at the colors I need to get out there and experience some of these materials more. Thanks. Aurea Gillis
ReplyDeleteWonderful! I have seen so many beautiful works done with the EZ dresden ruler that I think I need one!!
ReplyDeleteI love the color wheel. The binding fabric looks great. Thanks for sharing.
ReplyDeleteBarb@Witsend
Thanks for the tutorial - your color wheel is fabulous!
ReplyDeletesuper cute idea! i love the idea of sewing everything together and then cutting them out. super easy! thanks for the give away
ReplyDeleteSuch an inspiring tutorial! I love this quilt - thanks so much for sharing :)
ReplyDeleteI love rainbows. Your tutorial was so thorough. Thank you for writing it up!
ReplyDeleteWonderful tutorial, thank you so much! Great tips that will help to make it more simple for me!
ReplyDeleteI like the way you finished the edges of your dresden plates, it gives it a modern look, which I like.
ReplyDeleteI'd love to win the ruler.
Thank you for sharing.
Each idea of how to use the ruler gets better and better ! I love the colors in your quilt....thanks for the inspiration!
ReplyDeleteNice job on the tute! I like this a lot :)
ReplyDeleteThanks for the great tutorial and for the giveaway.
ReplyDeleteI absolutely adore this project! Thanks so much for the tutorial!
ReplyDeleteI love this quilt! I would have never imagined all the things you can do with just one ruler!
ReplyDeleteI love ,fabulous.Thanks for the tutorial,this go to my to do list!
ReplyDeleteThis is just TOO CUTE!!! Thank you bushels for the lovely tutorial. :)
ReplyDeleteWow, gorgeous. I've got to make one of these! Thanks
ReplyDeleteYears ago my grandmother had a Dresden plate quilt and I know it was my inspiration to start quilting..it's always been my favorite design and I adore your color-wheel clog, what a modern design.
ReplyDeleteshel704 at aol dot com
It is a good idea. Thank you for the tutorial.
ReplyDeleteBrooke, what a wonderful tutorial and quilt! Love the striped binding - Sweet!!
ReplyDeleteThat is such a beautiful quilt, and the binding for it is perfect!
ReplyDeleteI adore your color cog quilt..what an interesting way of making a Dresden Plate..Thanks for sharing your tutorial!
ReplyDeleteThe colors in this are marvelous! Thanks for sharing your talent and hard work. I had only just heard of these rulers a few months ago from a quilting friend who also made a skirt from it.
ReplyDeleteBeautifully executed! Totally awesome.
ReplyDeleteLove love love!! Thanx for sharing the how-to.
ReplyDeleteI love, love, love this quilt! After I read this post I wanted to go make it right then. Thanks for the tutorial! This is definitely on my list of things to make.
ReplyDeleteNow we're all looking at your quilt and wondering why we didn't think of that idea!
ReplyDeleteSo much fun, so colorful, so great! One of these that I just love everything about, the second I see it!
ReplyDeleteThanks for a chance to win! I'm learning that this ruler can do a lot.
I just don't have that much fabric and color variety in my stash ;-(
How gorgeous! So effective, and you make it seem so easy :)
ReplyDeletei am a sucker for color wheel work, and the creativity here is astounding! i love this quilt!
ReplyDeleteWow! This is my favorite project so far! Love everything about it! Great job!
ReplyDeleteWowzers! Every time I see one of these Dresden projects I think its my favorite, until I see the next one. Great job, thanks for the giveaway chance!
ReplyDeleteWoW!! Love your Cog Wheel. I've never seem that design before. Great tutorial and can't wait to make one for myself. Thanks for sharing.
ReplyDeleteThank you for a super giveaway and a chance to win.
usairdoll(at)gmail(dot)com
What a fun color wheel tutorial.
ReplyDeleteLOVE this!! Never saw anything like this before either!
ReplyDeleteOh! Another to add to my To Do List! Sweet small quilt!
ReplyDeleteThat is one super tutorial, it looks amazing and I have some great ideas to try with it.
ReplyDeleteThank you
What a great design and wonderful tutorial!!!!! Thank you for participating in the hop!
ReplyDeleteThis is amazing! Love your creativity!! The binding really adds interest also !
ReplyDeletePatti
Olthoff6@comcast.net
Your tutorial is great...easy to follow!! Thanks for the chance to win!!
ReplyDeletevery cool design and great instructions!
ReplyDeleteLove your color wheel! Thanks for the giveaway!
ReplyDelete